How to Set up Respondent Identification in Qualtrics?
How to Set up Respondent Identification in Qualtrics?
Written by: Katarína Kováčiková, CRM consultant
In the following lines, we will focus on the use of a function called authentication.
These will be situations in which participants need to be verified when sending the survey via an anonymous link.
In this article, we describe the exact procedure for creating a function, and in the end, we will focus on a brief description of customization options.
Because anyone can complete an anonymous survey, Authenticator allows us to take advantage of its features and benefits while ensuring that the survey only covers selected individuals.
The principle of the whole function is that the system compares the existing set of contacts (participants) with the entered text in the field for authentication. If we don’t already have a list, we’ll create a set of contacts in the contacts library to be surveyed.
For any survey, we can define (bulk upload) our list of contacts, with which the system will compare the record entered by the respondents in the field for authentication. We can understand the contact list as a basis for verification.
When respondents begin completing the survey, the system will prompt them to authenticate. Authentification can use more ways, but usually, an e-mail address is used.
When respondents try to log in, two situations can occur:
– log in information is correct, authentication is successful, and respondents can continue with the survey,
– authentication fails, respondents are prompted to re-enter the required information.
Guide to create an authentication:
1. if we are working directly in the survey, it is necessary to click on the top bar on Survey Flow.
Note. Make sure the respondent knows that identification will be required.

Note. Before we start creating an element, make sure we have created our worksheet in the Library.
2. click on the green text „Add a New Element Here“.
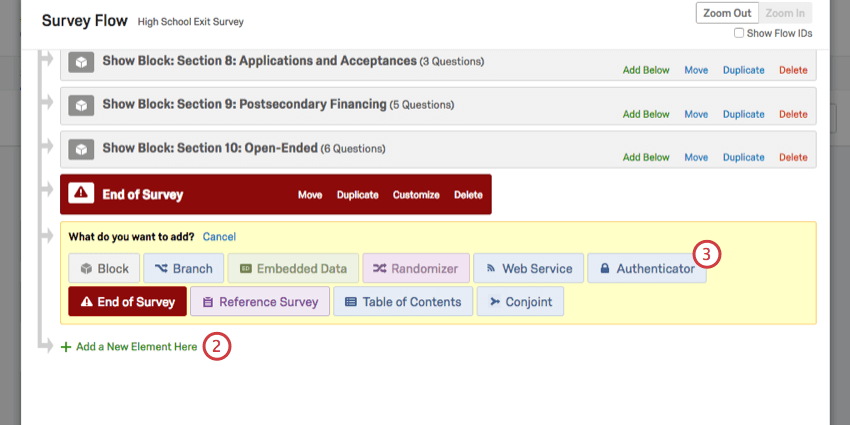
3. on the print screen, we can see several helpful elements. However, we will choose Authenticator.
4. the actual creation of the Authenticator can be clicked anywhere in the flow. If we want to have it at the beginning of the whole survey, we will use the “Move” option.
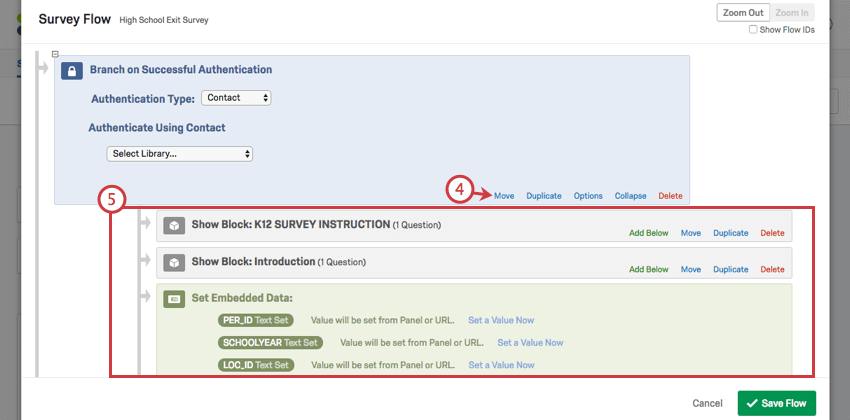
5. it is necessary to pay great attention to the fact that all blocks and elements that we want to authenticate (protect) are nested under the Authenticator element. They are not in the survey flow at the external level as an authenticator, but below the Authenticator, they are indented or nested.
If the logic described above is not created, then all elements that are not nested can be accessed without authentication.
6. we choose in which Library we have created contact list, which is needed to connect with the Authenticator.
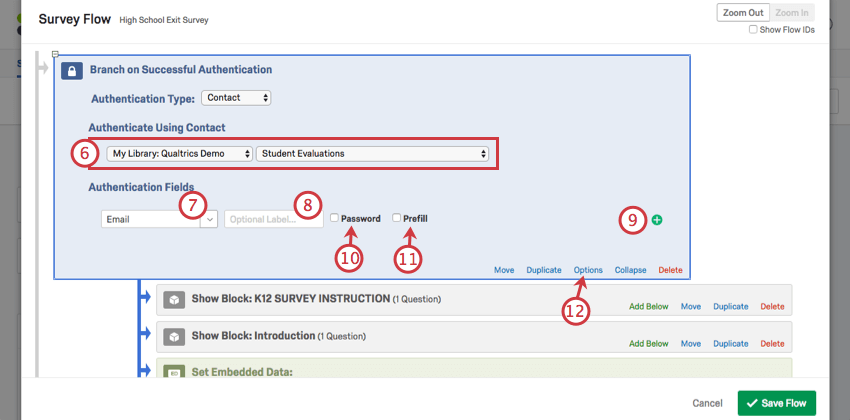
7., 8. in the Authentication Fields, select which field from the contact list the respondent will have to enter during the authentication step.
9. we will use the green plus sign (+) option if we need more authentication because the verification does not have to be only based on e-mail, it can be a surname, first name. In principle, we can use any field that we create in the contact list.
10. if necessary, we can choose the Password checkbox, which ensures the hiding of the entered text.
11. the Prefill option allows automatic user authentication.
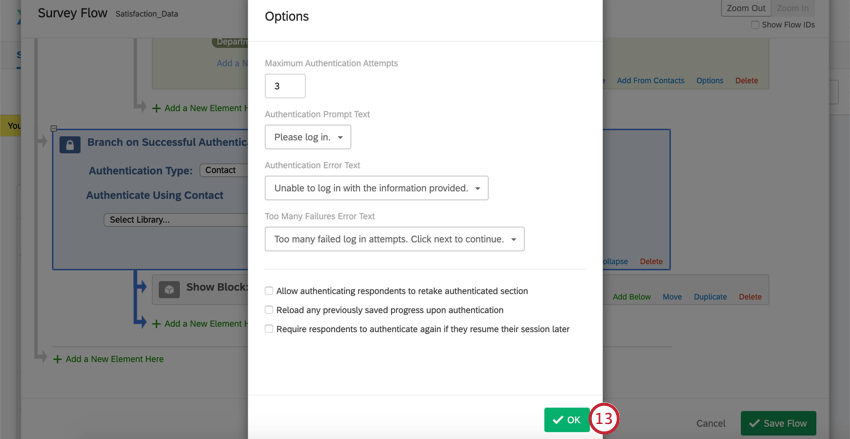
12. If the situation requires more specification, the user can customize all the necessary functions in the Options.
Authenticator Options
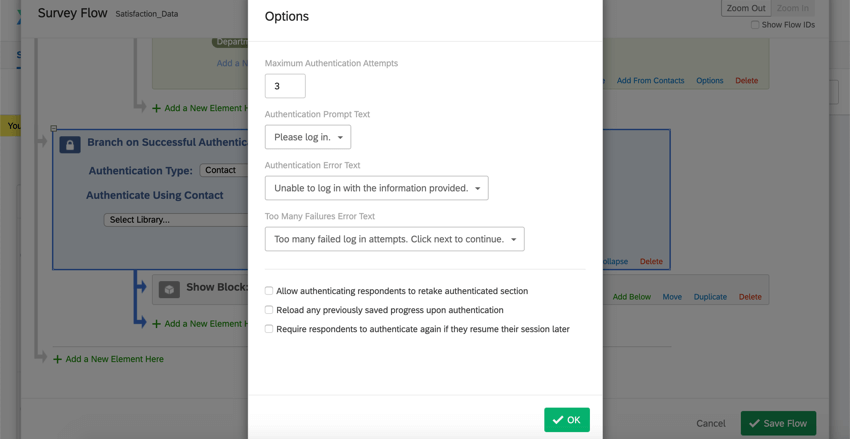
As these settings require specific attention in some cases, and the procedures would be more comprehensive, we explain the brief function of the options in the following text.
Maximum Authentication Attempts
The number of authentication attempts before the user is excluded from our survey.
Authentication Prompt Text
Allows changing the message that is displayed to the user after successful authentication. We can edit the wording of the message in our text library.
Authentication Error Text
Allows changing the message that is displayed to the user after a failed authentication. In this step, we can choose our own or create a new error message.
Too Many Failures Error Text
Allows changing the text that is displayed to participants who have already had the maximum number of login attempts. In this step, we will again choose our own or create a new error message.
Allow authenticating respondents to retake an authenticated section.
The system allows the user to authenticate only once. If the user has authenticated successfully and passed the entire survey, the system will not allow him to complete the survey again. However, by selecting the option, the system will allow multiple logins.
Reload any previously saved progress upon authentication
It is used to ensure that the already completed part of the survey is reloaded.
Example: If a respondent completes a survey, then interrupts it in some part and then logs in again, he can continue in the part where he stopped.
Require respondents to authenticate again if they resume their session later
If the respondent successfully authenticates, then interrupts the completion of the survey and later wants to continue completing, he must log in again. As an option, we will ensure that it is not needed again.
13. click on SAVE.